React类组件生命周期:从底层逻辑到Hooks实战指南
很多刚接触React的新手,或者习惯了Hooks的人,看到类组件(Class Components)里的那些
Commit 阶段:这是 React 真正把计算结果应用到真实 DOM 的过程。此时操作 DOM 或处理副作用才是安全的。
执行顺序是:
执行顺序:
只有一个方法:
具体配置对比示例:
下一篇
别再死磕视频课了,把 Python 练手项目开源才是打破焦虑的捷径 →
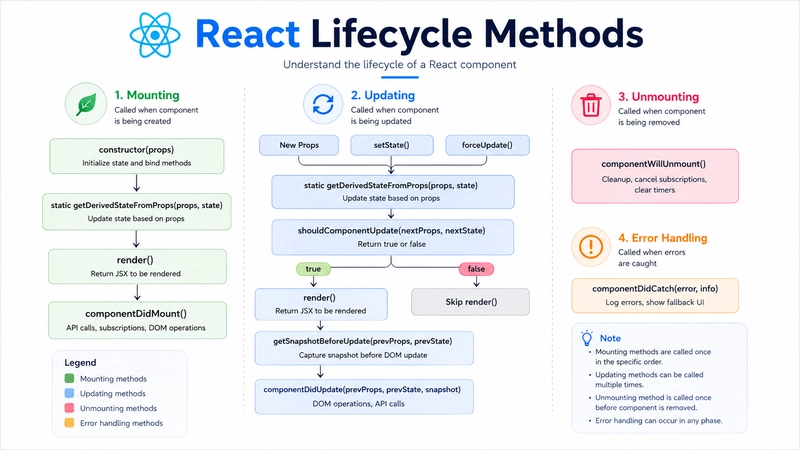
componentDidMount、componentDidUpdate会觉得极其混乱。其实只要理清一个核心逻辑:React把组件的生命周期分成了“Render阶段”和“Commit阶段”,所有的生命周期方法本质上就是在这两个阶段的不同时间点挂载的钩子。如果把组件比作一个人,Mounting就是出生,Updating是成长变化,Unmounting就是离开。
一、 必须搞清楚的 Render vs Commit
很多代码写出 Bug 就在于在错误的时机执行了副作用。
Render 阶段:这是 React 计算 UI 应该长什么样的过程。这个阶段的代码必须是“纯”的,不能有副作用。
- 正确操作: 读取 props、计算显示数值、返回 JSX。
- 禁忌: 在这里发 API 请求、直接操作 DOM 或调用
setState(会导致死循环)。
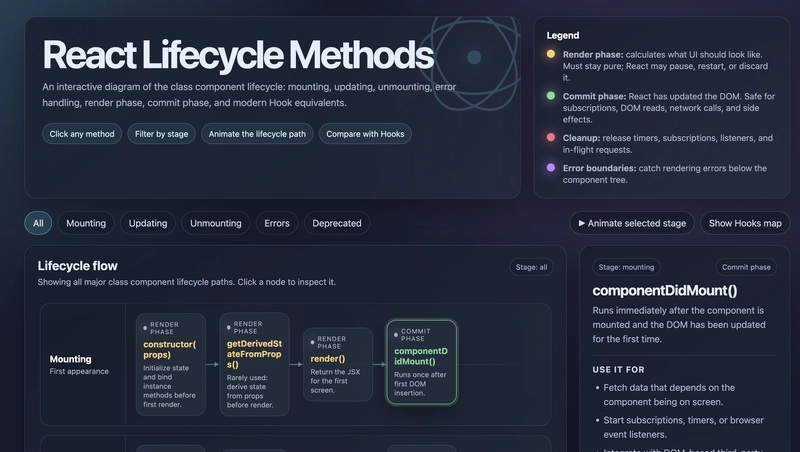
Commit 阶段:这是 React 真正把计算结果应用到真实 DOM 的过程。此时操作 DOM 或处理副作用才是安全的。
- 正确操作: 启动定时器、请求后端数据、手动修改 DOM 元素。
二、 类组件生命周期实操流程
虽然现在流行函数组件,但在维护老项目或写 Error Boundary 时,类组件的执行顺序至关重要。
1. 挂载阶段 (Mounting)
执行顺序是:
constructor → getDerivedStateFromProps → render → componentDidMount。其中最核心的是 componentDidMount,它是最适合做初始化请求的地方。
class UserProfile extends React.Component {
  componentDidMount() {
    // 这里的代码在组件挂载到 DOM 后立即执行
    // 适合做 API 调用
    fetch(`https://api.example.com/user/${this.props.id}`)
      .then(res => res.json())
      .then(data => this.setState({ userData: data }));
  }
}
2. 更新阶段 (Updating)
执行顺序:
getDerivedStateFromProps → shouldComponentUpdate → render → getSnapshotBeforeUpdate → componentDidUpdate。这里最容易踩坑的是 componentDidUpdate。如果你在里面调用 setState 而没有加判断条件,组件会陷入无限循环更新。
错误示范:
componentDidUpdate() {
  this.setState({ count: this.state.count + 1 }); // ❌ 导致无限循环
}
正确实操(必须对比旧值):
componentDidUpdate(prevProps, prevState) {
  // 只有当 ID 真正变化时才重新请求,避免无效渲染
  if (this.props.id !== prevProps.id) {
    this.fetchData(this.props.id);
  }
}
3. 卸载阶段 (Unmounting)
只有一个方法:
componentWillUnmount。它的唯一作用就是“清理现场”。componentWillUnmount() {
// 清理定时器,防止内存泄漏
clearInterval(this.timer);
// 取消订阅
window.removeEventListener('resize', this.handleResize);
}三、 类组件到 Hooks 的映射关系
对于习惯用 useEffect 的开发者,可以这样快速理解两者的对应关系:
componentDidMount$\approx$useEffect(() => { ... }, [])(依赖项为空数组)componentDidUpdate$\approx$useEffect(() => { ... }, [dep])(依赖项为特定变量)componentWillUnmount$\approx$useEffect中返回的 cleanup 函数
具体配置对比示例:
类组件写法:
componentDidMount() {
  console.log('挂载了');
}
componentWillUnmount() {
  console.log('卸载了');
}
Hooks 等效写法:
useEffect(() => {
  console.log('挂载了');

  return () => {
    console.log('卸载了');
  };
}, []);
四、 避坑指南:Error Boundaries
目前 React 的 Error Boundary(错误边界)仍然必须用类组件实现,因为 componentDidCatch 和 static getDerivedStateFromError 还没有对应的 Hook。
如果你需要捕获子组件的崩溃并显示降级 UI,必须这样写:
class ErrorBoundary extends React.Component {
  state = { hasError: false };

  static getDerivedStateFromError(error) {
    // 更新状态,下次渲染时显示备用 UI
    return { hasError: true };
  }

  componentDidCatch(error, info) {
    // 可以在这里把错误上报到 Sentry 或日志系统
    console.log('捕获到错误:', error, info);
  }

  render() {
    if (this.state.hasError) {
      return <h1>出错了,请刷新页面尝试</h1>;
    }
    return this.props.children;
  }
} 免费 AI 工具箱 · 全部完全免费
全部回复 (2)
脚
脚本小子小柯
专家
2026/7/25
我之前在didMount里写定时器,后来发现如果不记得在willUnmount里销毁,内存泄漏真的头大。
0
程